Cameras
VAMPIRES uses two Hamamatsu ORCA-Quest [manual] CMOS detectors for its science cameras. There is also a UNKNOWN FLEA camera used for the pupil return beam (pupil cam).
Initialization and Viewers
Each camera has its own framegrabber and viewer class which inherits a common interface from camstack.
VCAM1 and VCAM2
SSH for VNC
Make sure to forward your display over SSH if running from the VAMPIRES VNC
$ ssh -Y sc5
To start the camera framegrabber (which should not be done unless necessary)
scexao5 $ camstart vcam1 # start vcam1
scexao5 $ camstart vcam2 # start vcam2
if the cameras are already running, this will restart their processes (including TCP streams, etc.), and revert to the default STANDARD crop.
To start the pygame viewers
scexao5 $ vcam1 & # cam 1 viewer
scexao5 $ vcam2 & # cam 2 viewer
the viewers can also be ran from sonne or scexao6 using the SHM stream forwarding.
Raw SHM Viewer
If you want to see the raw data (useful to see MBI frames without cropping), use one of the generic viewers with the appropriate SHM name (vcam1/vcam2)
scexao5 $ anycam vcam1 # pygame viewer
scexao5 $ shmImshow.py vcam1 # qt viewer
Be careful using anycam with the MBI crop- the window is much larger than the VNC viewer desktop. Use -b 2 or -b 3 to bin down to a more reasonable size
VPUPCAM
sonne $ camstart vpupcam # start vpupcam
sonne $ vpupcam &
Detector Readout Modes
VAMPIRES has two readout modes: “Slow” and “Fast”. The main differences are the maximum framerate and read noise. The slow mode uses the extra readout time to reduce the jitter in the ADC conversion, which enables sensitivity low enough for photon number resolving. The noise characteristics of the cameras are only related to the readout mode. The timing characteristics, however, are dependent on the camera crop and trigger modes with a somewhat complicated relationship that also depends on the readout mode.
Mode |
Cam |
Gain (e-/adu) |
RN (e-) |
DC (e-/px/s) |
|---|---|---|---|---|
Fast |
1 |
0.103 |
0.403 |
3.6e-3 |
Fast |
2 |
0.103 |
0.399 |
3.5e-3 |
Slow |
1 |
0.105 |
0.245 |
3.6e-3 |
Slow |
2 |
0.105 |
0.220 |
3.5e-3 |
Photon Transfer Curves
These photon transfer curves were fit with the use of frame-differencing to remove the fixed pattern noise. The bias is not estimated from any light frames, but from a bias frame directly after fitting the gain.
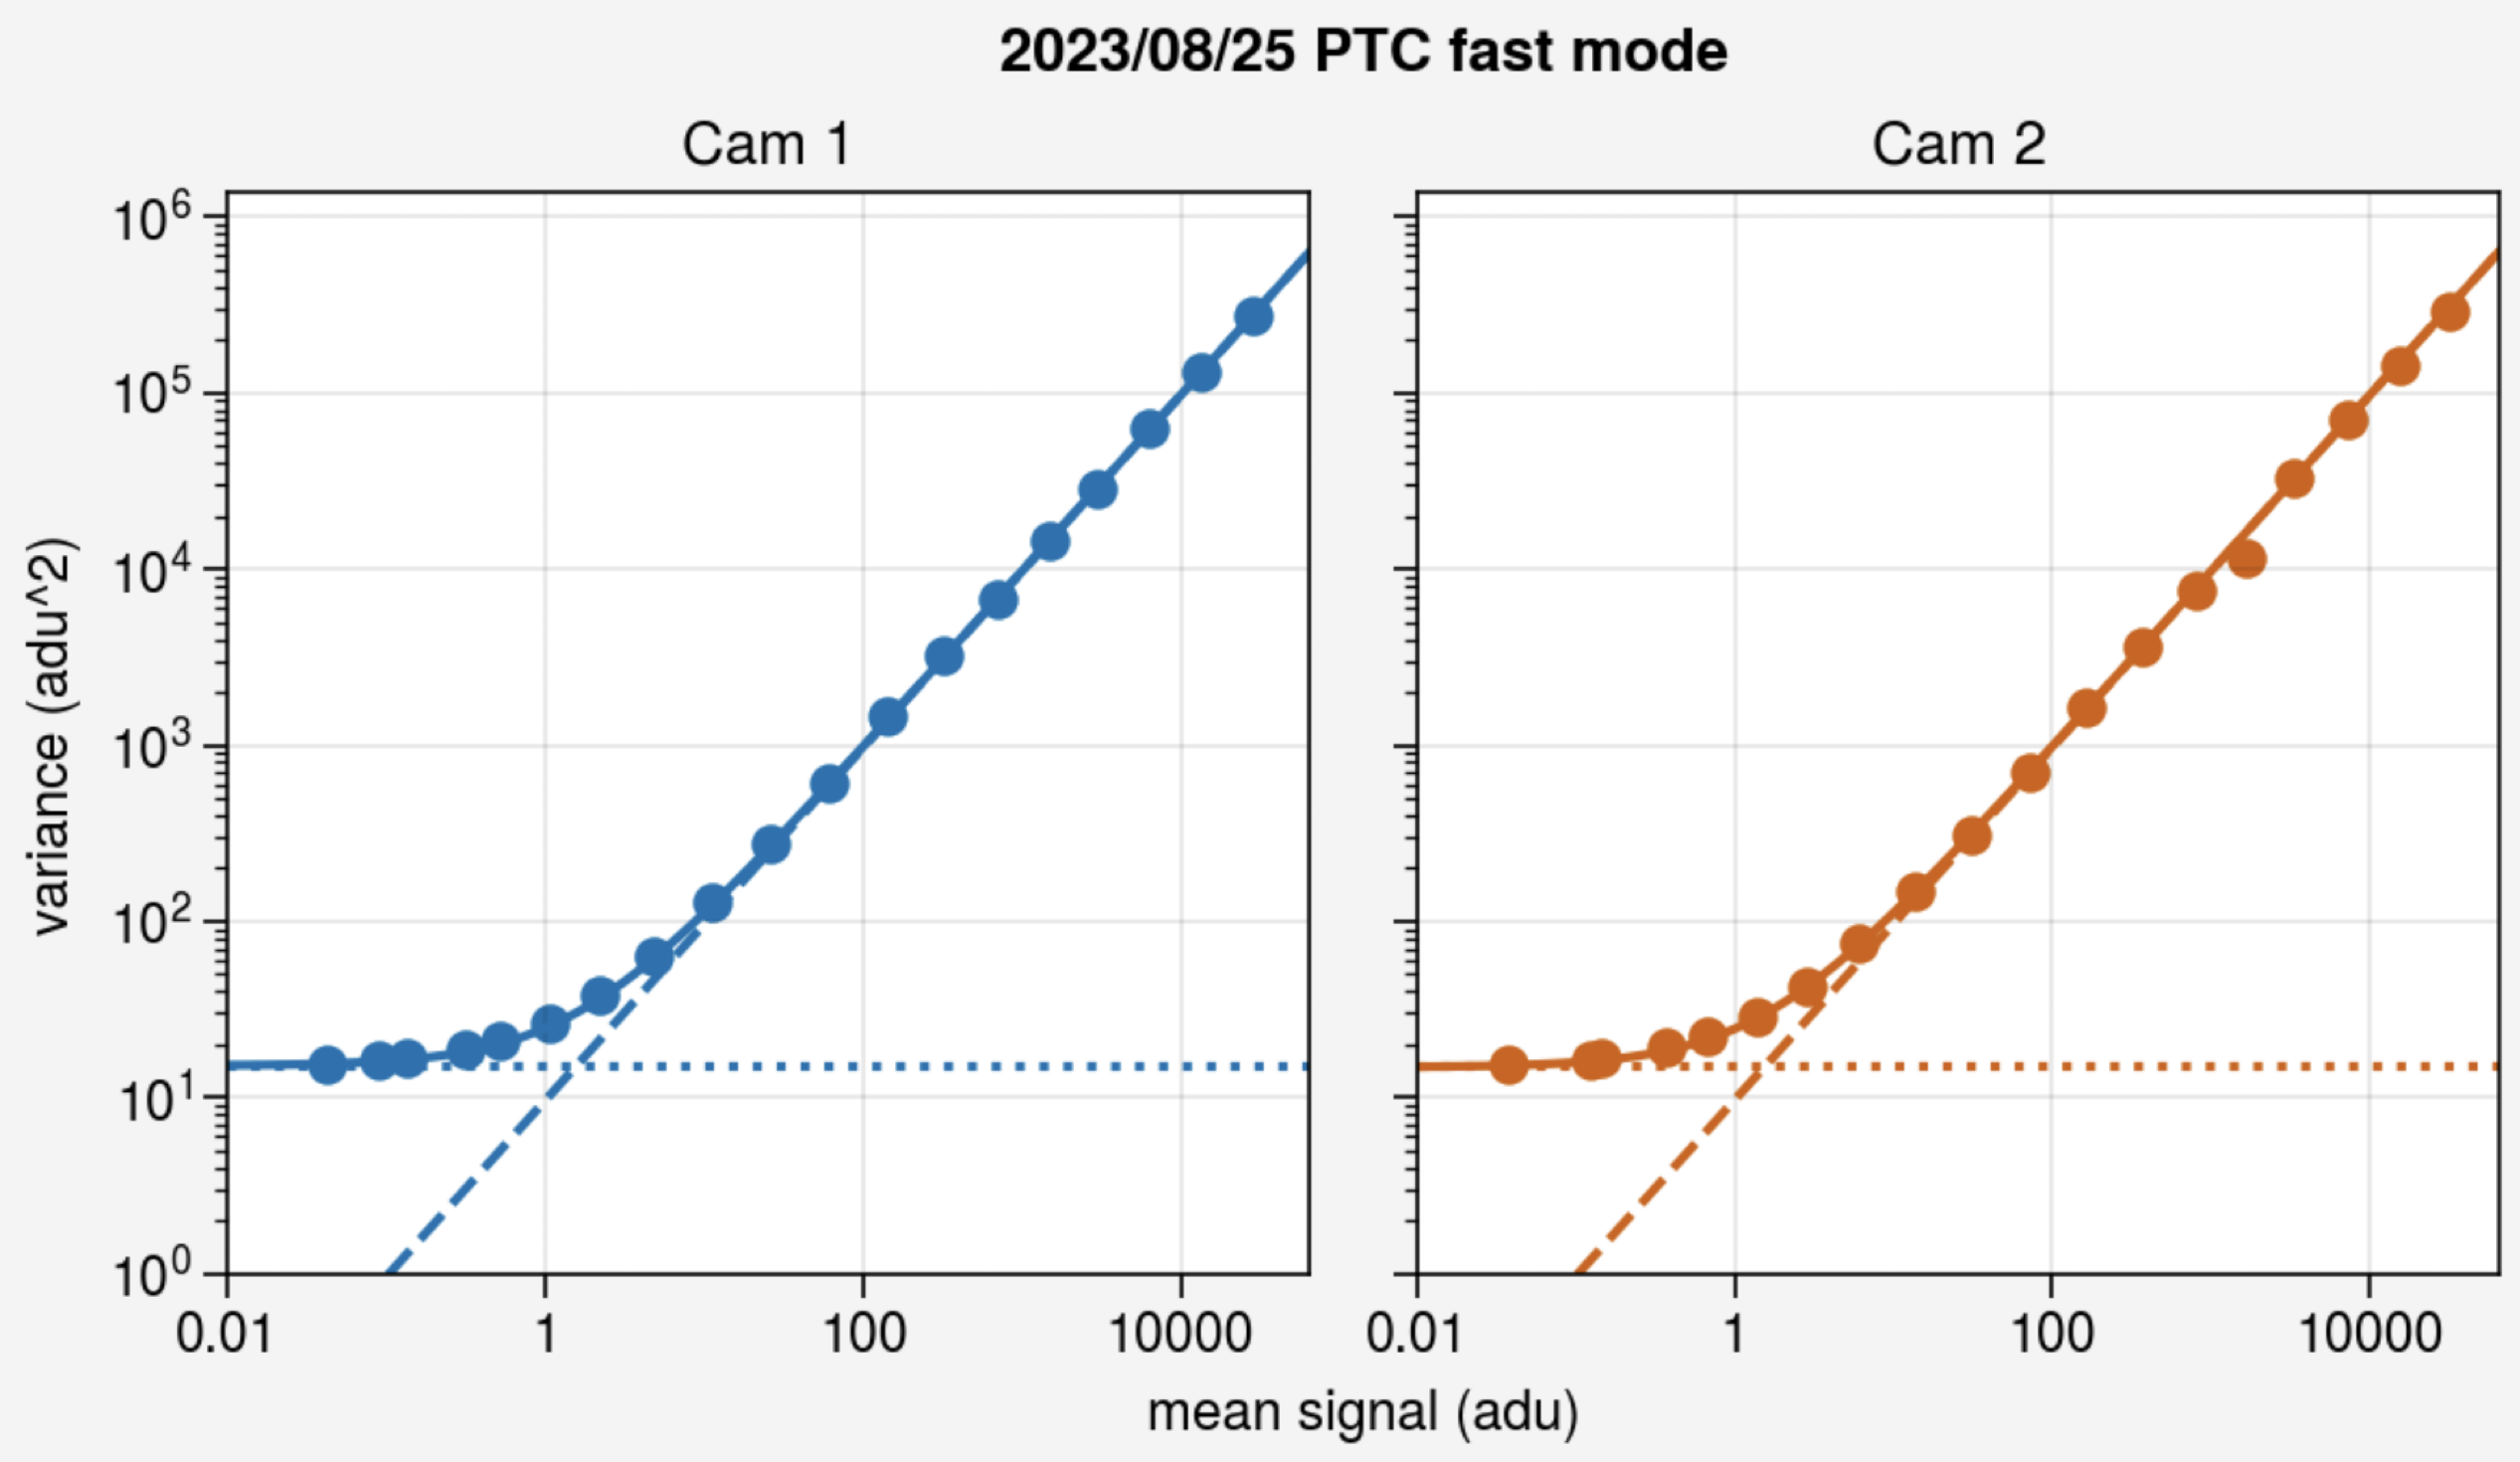

Note: The minimum detector integration time determines the saturation limit for VAMPIRES. In fast readout mode, the minimum is the minimum for four rows to read out. At this speed, that means there is an extreme rolling shutter effect, so each group of four rows will be simultaneous but no group of 4 will overlap in time.
Framegrabber reset
When you change the readout mode the camera framegrabber has to reset, so you’ll have to wait for it to restart before acquisition can resume.
sonne $ set_readout <mode>
Detector Astrometric Solution
The astrometric solution for each camera is derived from observations of visual binaries
Cam |
px. scale (mas/px) |
PA offset (deg) |
Inst. offset (deg) |
|---|---|---|---|
1 |
5.908 ± 0.014 |
102.10 ± 0.15 |
-38.90 ± 0.15 |
2 |
5.895 ± 0.015 |
102.42 ± 0.17 |
-38.58 ± 0.17 |
Camera Crops
VAMPIRES has three camera modes to accommadate the different crops required for the multiband imaging mode
Standard
This is the standard 3”x3” FOV crop
sonne $ set_crop standard
There are also some reduced crop sizes
sonne $ set_crop twoarc # 2" x 2" FOV
sonne $ set_crop onearc # 1" x 1" FOV
sonne $ set_crop halfarc # 0.5" x 0.5" FOV
MBI
This is a 12”x6” crop that accommadates the four 3”x3” fields produced in the multi-band imaging (MBI) mode.
sonne $ set_crop mbi
MBI Reduced
This field crops out the 625nm field so that the maximum readout speed of the detector can still reach ~500 fps while still imaging three 3”x3” FOVs.
sonne $ set_crop mbi_reduced
Pupil
This crop is like the standard crop but larger to accommadate the size of the full pupil when imaged with the pupil-imaging lens. Note that currently it is only possible to get a focused pupil image on VCAM1.
sonne $ set_crop pupil
Exposure time
To set the camera exposure time (in s)
sonne $ set_tint <tint>
to get the exposure time
sonne $ get_tint
You can try to automatically set the exposure time to a given maximum value (in adu)
sonne $ target_tint <adu>
You can also set/query the framerate, although these values become confusing when using the external trigger because the framerate is no longer the inverse of the exposure time.
sonne $ get_fps
sonne $ set_fps <fps>
Camera Triggering
The cameras are synchronized using a hardware micro-controller (Metro M4 Express). This controller also synchronizes the AFLC when it is enabled. It is important to understand that there are two interfaces required for hardware triggering: the detector external trigger setting and the micro-controller trigger settings.
The cameras need to be set to external trigger mode in order to send and receive trigger signals-
sonne $ set_trigger enable
then the micro-controller can be enabled
$ vampires_trig enable
The state diagram for the camera trigger is as follows:
AFLC Disabled
$ vampires_trig set --no-flc
![digraph {
node [shape=box]
"trigger cameras" -> {
"wait for camera 1 ready";
"wait for camera 2 ready";
} ->
"logical AND" ->
"trigger cameras";
}](../_images/graphviz-477e1df7ffc85272e99e0782b332c35dae901eea.png)
AFLC Enabled
Critical: FLC jitter
When saving the camera SHM streams there is no way to know a priori the FLC state of each frame. To overcome this, we add an asymmetric delay so that every other frame can be consistently identified from the framegrabber timestamp. We call this delay the FLC jitter.
It is critical that the FLC jitter is larger than any statistical randomness in the frame timings. For our ORCA-Quest detectors, there is an inherent stochasticity that is a function of the detector readout mode (7.2 us in FAST mode and 172.8 us in SLOW mode). The jitter half-width (half the total jitter) is set directly with the vampires_trig command. After testing, we recommend using 500 us for the half-jitter value, which is the default. If you need to use a different jitter value, pass it to the vampires_trig command
$ vampires_trig set --flc --jitter 500
Warning: AFLC Aging
We want to limit the usage of the AFLC to minimize aging effcts, so when the cameras are not acquiring we recommend leaving it disabled with
$ vampires_trig set --no-flc
![digraph {
node [shape=box]
"trigger cameras A" -> {
"wait for camera 1 ready A";
"wait for camera 2 ready A";
} ->
"logical AND A" ->
"delay half_width A" ->
"trigger AFLC high" ->
"delay half_width B" ->
"trigger cameras B" -> {
"wait for camera 1 ready B";
"wait for camera 2 ready B";
} ->
"logical AND B" ->
"trigger AFLC low" ->
"trigger cameras A";
}](../_images/graphviz-4e34aadef4a6ec1da1b12d5fe846d32b0981691b.png)
Crop location and MBI hotspots
The crop location for the standard crop (and the smaller subcrops) are always centered on the detector. The MBI crops are more complicated and the hotspots for each PSF are required for the camera viewers and the WCS dictionary info.
There is an automated script for fitting MBI hotspots and copying the crop information over to camstack. First, set up the cameras in dual-camera MBI mode
$ vampires_mbi dichroics &
sonne $ set_crop mbi
Then prepare a scexao5 terminal to run the hotspot code from \( ssh -Y sc5 sc5 \) conda activate vampires_control sc5 (vampires_control) $ vampires_hotspot
Finally, run vampires_hotspot --report --copy <shm>. The report creates the crop configurations from the hotspots, and copy will automatically populate the camstack config folder with the crops.
sc5 (vampires_control) $ vampires_hotspot --report --copy vcam1
sc5 (vampires_control) $ vampires_hotspot --report --copy vcam2
Afterwards, restart the cameras and viewers to utilize the new hotspots
sc5 $ camstart vcam1; camstart vcam2
sc5 $ vcam1 & vcam2 &
sonne $ set_crop mbi