Working with tmux shell (for remote control)
tmux ls # list tmux sessions
tmux list-session # list tmux sessions
tmux a -t {session-name} # open a tmux session
tmux new -s {session-name} # create a new tmux session with a new name
tmux rename -t {old-name} {new-name} # rename an existing session
Use Ctrl-b and then type d to detach from tmux
Pre-requisites
########## VERY IMPORTANT : AFTER EACH COMPUTER REBOOT, RUN :
cc-rightafterreboot
Real time displays setup
Launch the displays of the lives (each must be launched in their own terminal) :
1. start PL camera viewer
firstcam -z 1 &
# Start the camera viewer
2. starting the focal plane camera viewer
shmImshow.py fpupcam
# Start the camera viewer
Note: removed from operation
3. Display live flux injection map
Opti flux live, a new image is generated for every new saved cube :
firstpl_opti_start : link the shared memory with the saved data
firstpl_opti_show : display the content of the shared memory
Reconstructed image live : will reconstruct an image for every frame viewed by the camera using the coupling map located in /mnt/datazpool/PL/calibration_files/
Software setup
1. Overview
To control the FIRST-PL instrument using the tip/tilt miror and its electronics, several processes need to be running. These are:
the tip/tilt listener, which connects to the USB serial port on which the electronics is connected, and forwards incoming/outgoing data packets to the other processes.
the fitslogger, which saves the incoming frames in fits files needs to be started with a specific name for its FIFO queue, such that other processes can interact with it.
the fitsmerger, which monitors the data directory where new fits files are saved, and automatically merges the modulation extension into them.
and finally, the firstpl controller, which opens a terminal, starts the camera, and load all the pre-defined commands and scripts to control the instrument.
2. Starting the tip-tilt listener
Although not absolutely required, it is suggested to start the tip/tilt listener in a dedicated tmux terminal. To to do so, run:
tmux new -s firstpl_tt_listenerto create the tmux session if it does not existtmux a -t firstpl_tt_listenerto connect to the tmux sessionfirstpl_tt_listenerto start the listener
At this point, whenever a command is sent/received from the electronics, a blob of hexdecimal should appear in this terminal. If at any point, the electronics seem to misbehave, check that things are running properly in the listener.
To stop the listener, simply run the following commands in the terminal:
listener.stop()to disconnect from the USB port and ZMQ socketexitto exit the python terminal
3. Starting the fitsmerger
The fitsmerger should be started in its own tmux session:
tmux new -s firstpl_fitsmergerto create the tmux session if it does not existtmux a -t firstpl_fitsmergerto connect to the tmux sessionfirstpl_fitsmergerto start the fitsmerger
The re-synchronize the directory with the fitslogger, you can run merger.change_target_dir() from the fitsmerger terminal.
The fitsmerger will automatically look for new fits files and try to append the modulation table to them. If any error occurs, an error message will be displayed. The fitsmerger also checks that the number of dits in the files that are saved by the logger does match the requested number of frames, and can therefore be used to detect any issue with teh fitslogger.
4. Preparing the fitslogger
For use with the tip/tilt module, the fitslogger needs to be started with a specific name for its fifo queue, in order to allow the controller to interact with it. This is done by running the following commands in a terminal:
milk-streamFITSlog -d "/mnt/datazpool/PL/" -z 250 firstpl pstart
Note that this command is supposedly started by the control software. In order to view the fitslooger, enter:
firstpl_fitslogger
Once in the fitslogger screen, you can use the arrows to move around. Press [F2] to move to the FPS CTRL window, and the [RIGHT] to show the main screen.
The fitslogger is probably the most important thing to monitor carefully during the night. During the night, in case the fitslogger does not work properly, you should re-run this command. That will reset the fitslogger.
4. Run firstpl controller
For that, see section “Operations”
Optical setup
1. Pick off mirror
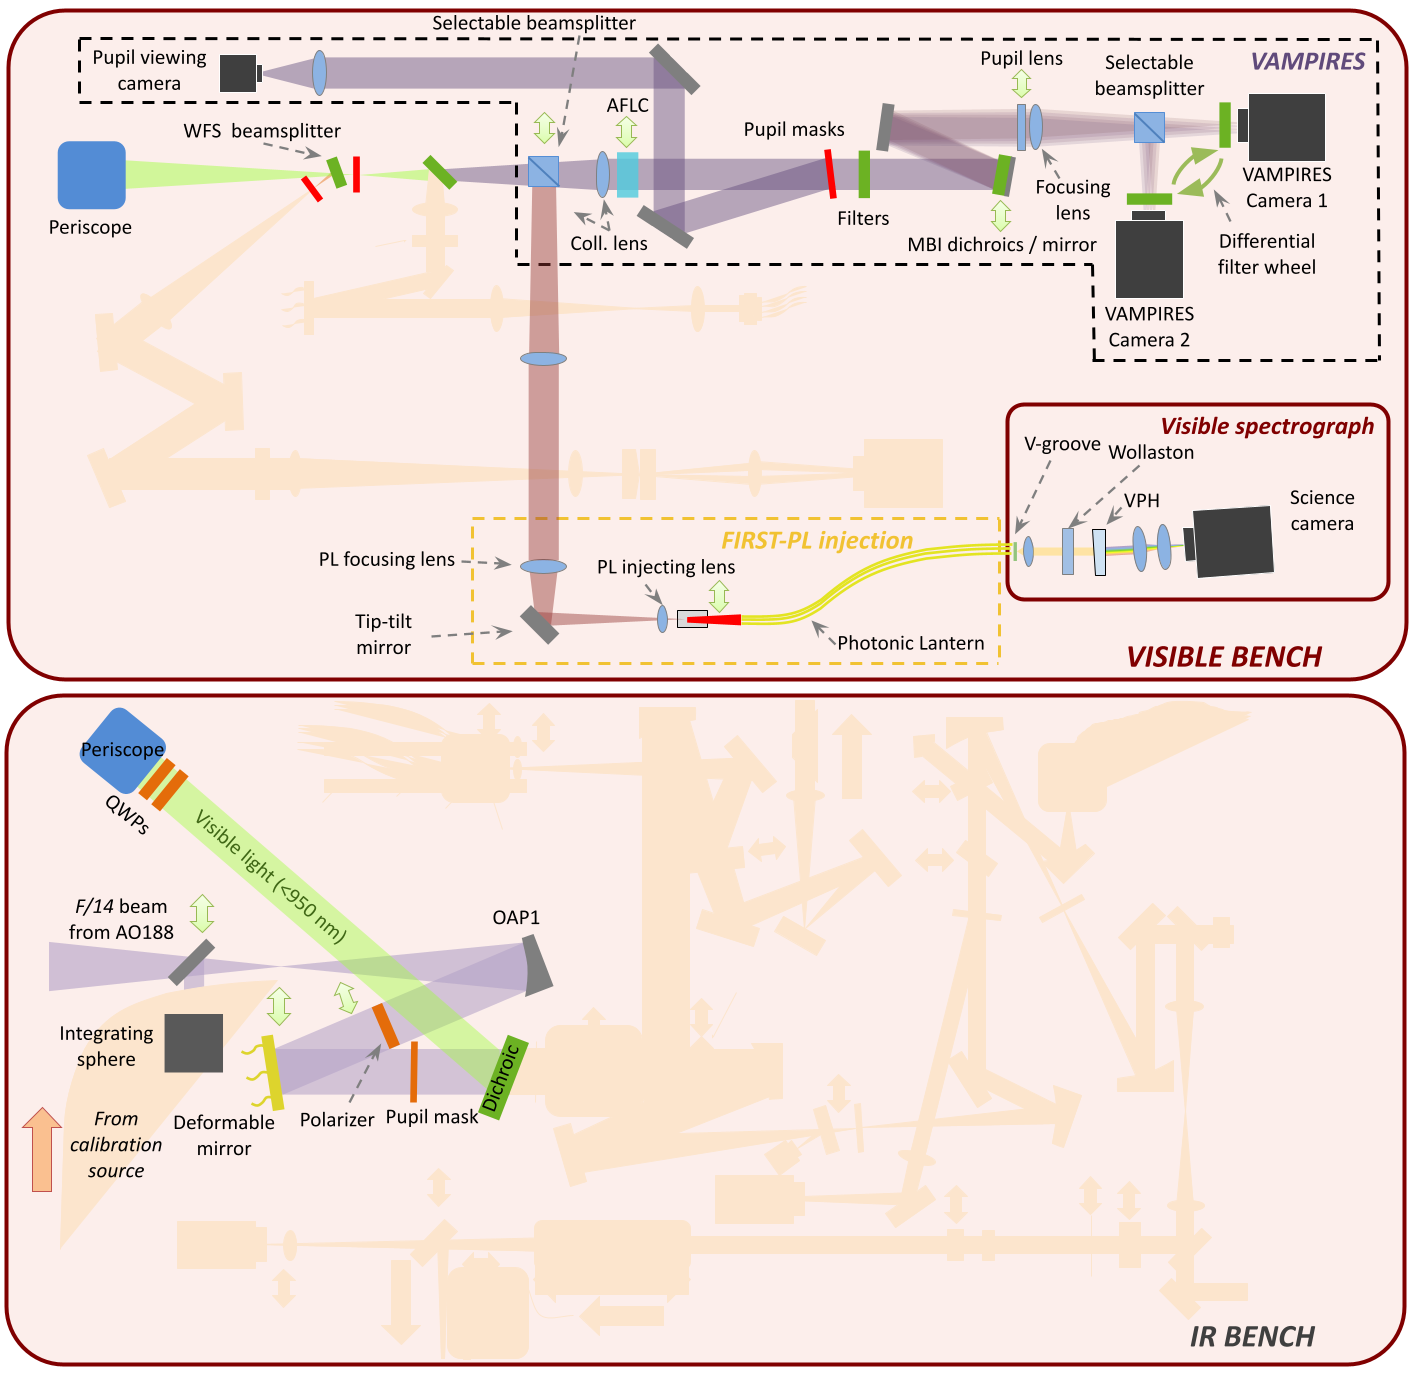
The pick off mirror for the lantern is called “selectable beam splitter” in the optical diagram above.
On sc20 computer, to know the status of the pick off mirror:
firstpl_pickoff status
To put the pick off mirror in:
firstpl_pickoff in
To put the pick off mirror out:
firstpl_pickoff out
also on the sc20 computer
2. Starting the supercontinuum source (for calibration)
On scexao@sc20 computer,
superk power on
Changing the intensity,
src_flux waymore
src_flux wayless
3. Checking the vis block
The blocking filter is inserted just after the WFS beamsplitter above.
On scexao@sc20 computer,
vis_block status
Changing the status,
vis_block in
vis_block out
4. Flattening the DM (in case of issues)
On the scexao@sc20 computer:
dmflat
To center the PSF of PALILA, use Ctrl + Arrow Keys.
5. Operation of the Calibration Unit
5.1 Pick off mirror
The pick off mirror of the calibration unit is inserted between the vis blocking filter and the selectable beam splitter.
On sc20 computer, to know the status of the wavelength calibration unit pick off mirror:
first_pickoff status
To put the pick off mirror in:
first_pickoff in
To put the pick off mirror out:
first_pickoff out
also on the sc20 computer
5.2 Operation of the Halogen Lamp
The Halogen lamp is powered by the SCExAO NPS number 2.
To power on the source from sc20 computer :
firstpl_halogen_power on
To power off the source from sc20 computer :
firstpl_halogen_power off
5.3 Operation of the Neon source
The Neon lamp is also powered by the SCExAO NPS.
To power on the source from sc20 computer :
firstpl_neon_power on
To power off the source from sc20 computer :
firstpl_neon_power off
6. Insertion of the wollaston
The command to move the wollaston in/out is :
first_pl_wollaston in/out
in the shell