Data organisation
Two main FITS file keywords are used to organise the data: “DATA-TYP” and “X_FIRTYP”. The first keyword is specific to SUBARU, the second one is specific to the FIRST instrument.
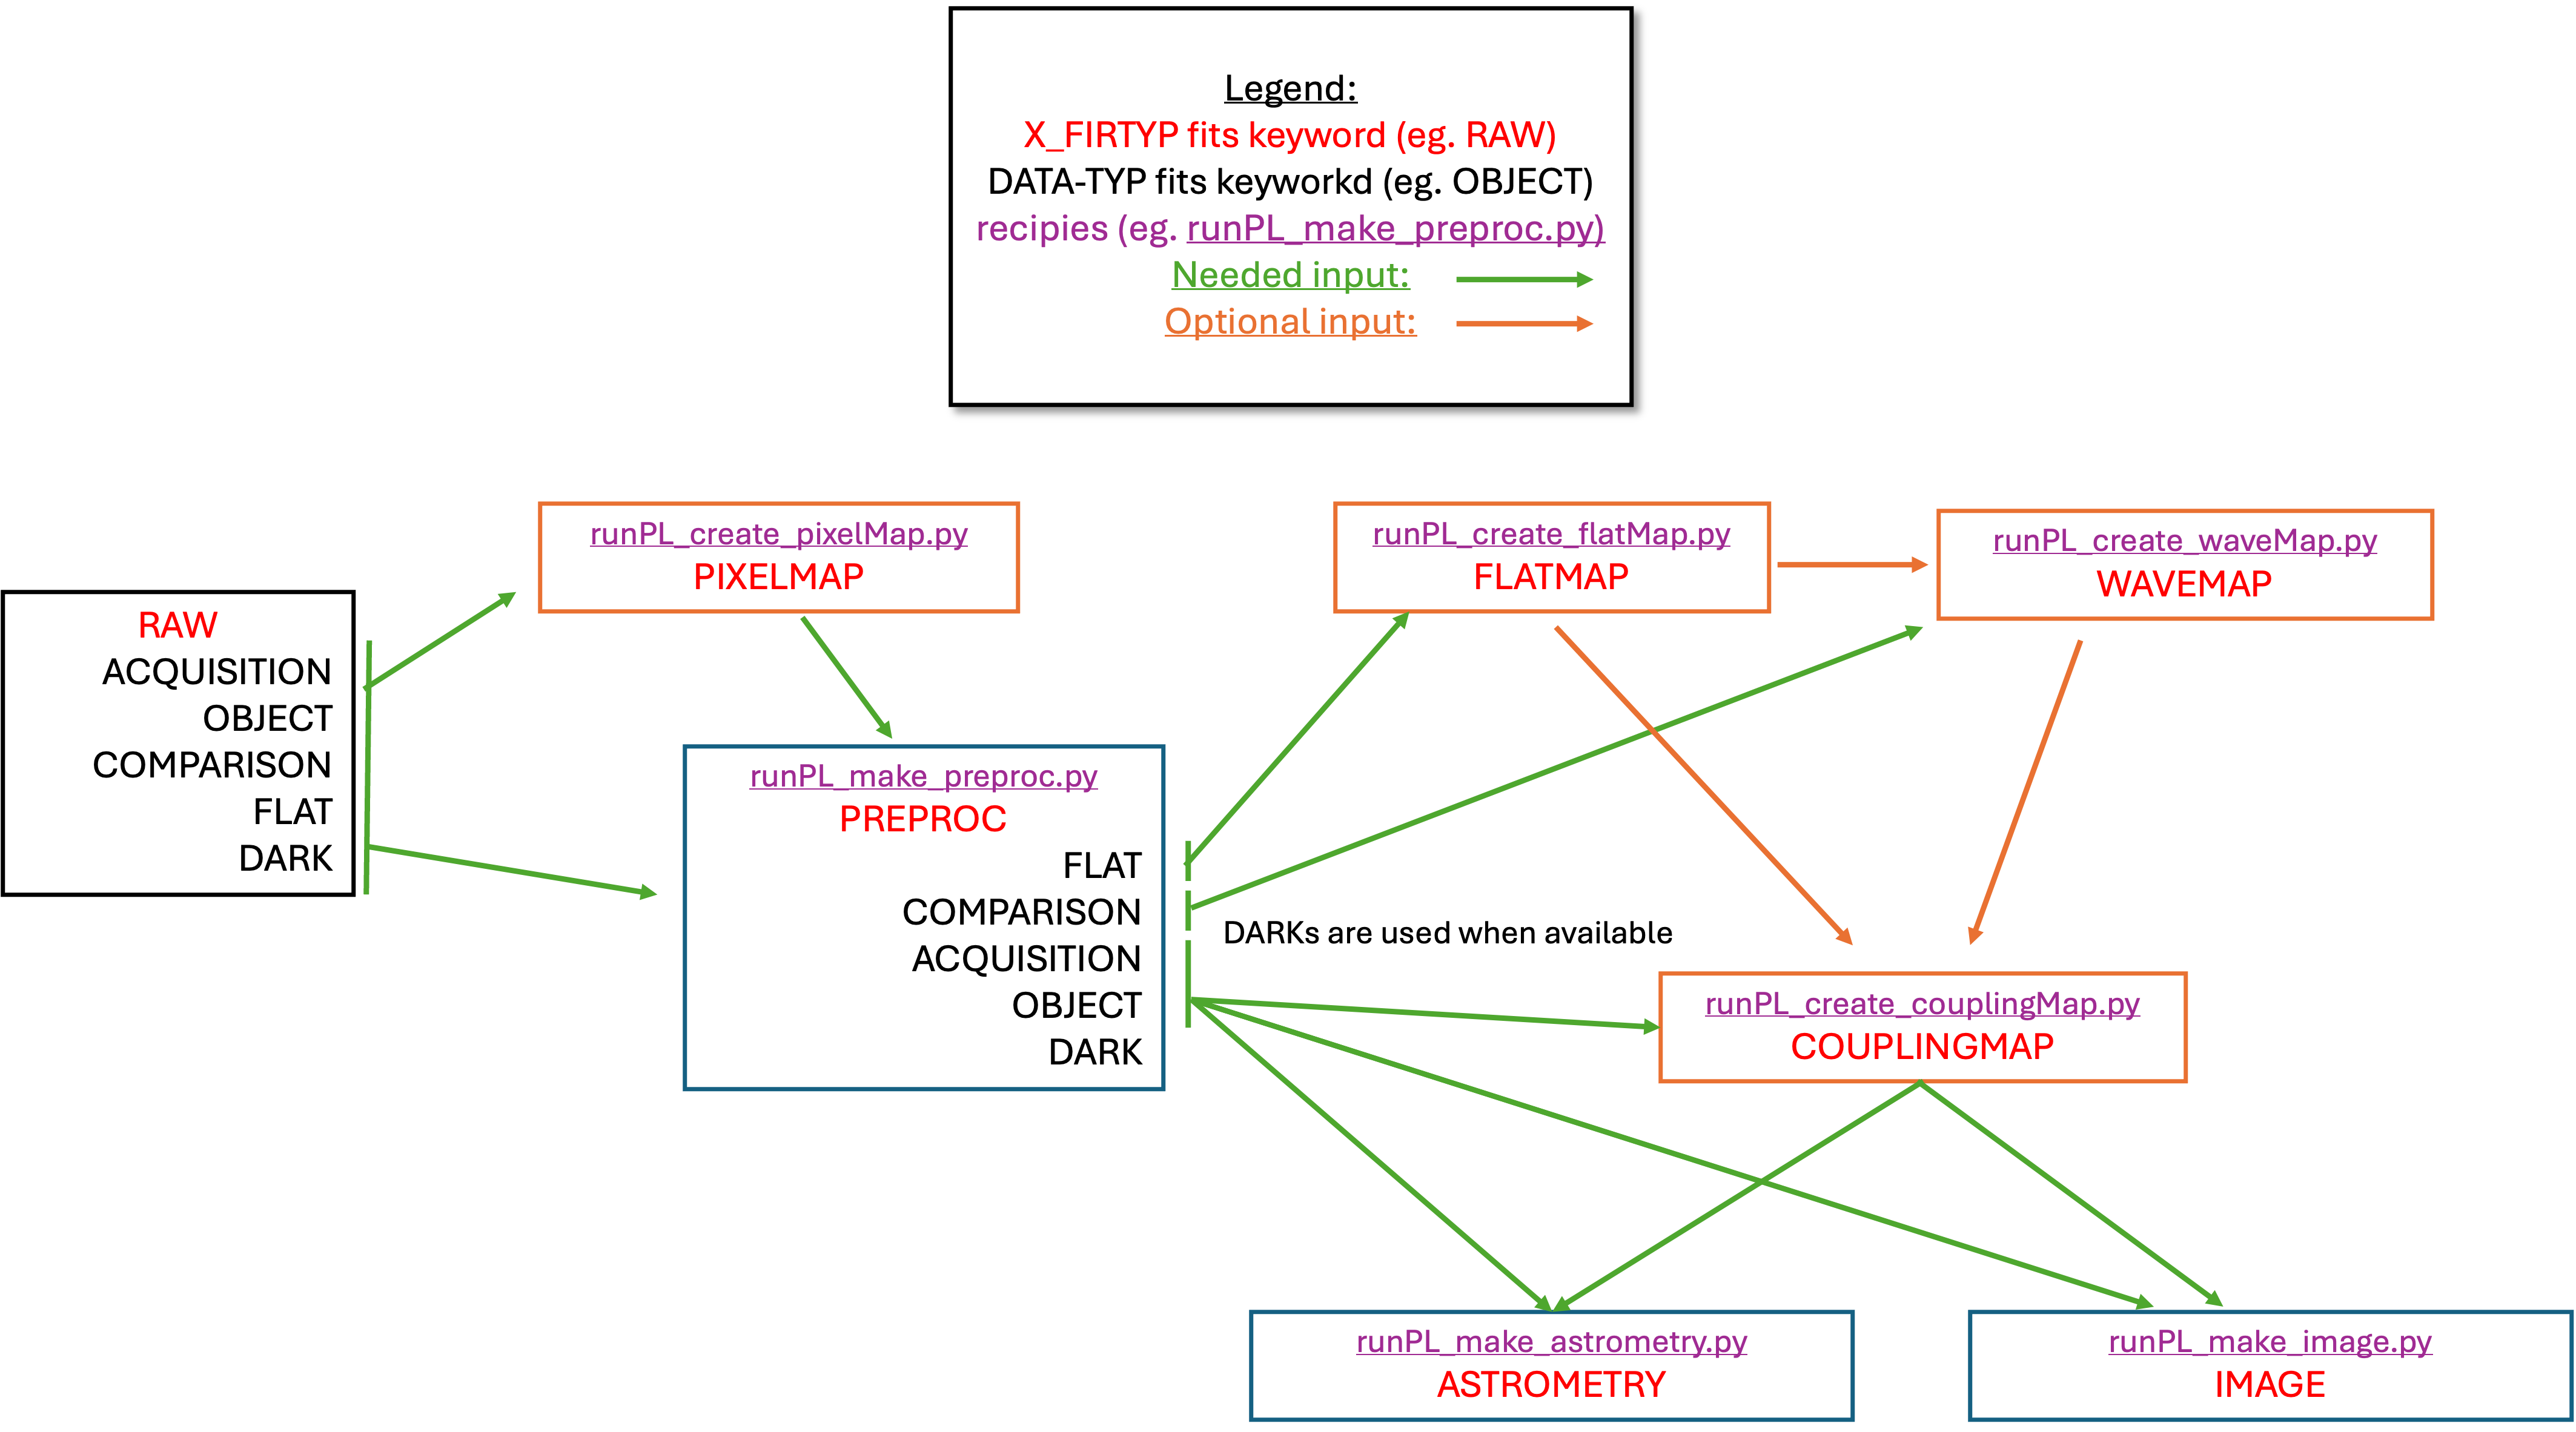
The “runPL_*.py” scripts are designed to run sequentially, each handling a specific stage of data reduction, calibration, and analysis.
The user will give the files as arguments to each script. If no argument is given, the script will look for all files within the current directory. The script will automatically select relevant data based on the FITS keywords.
Note: For the most up-to-date information, see the official README in the repository.
Installation
Clone the repository:
git clone https://github.com/scexao-org/first_pipeline.git
cd first_pipeline
Install the package in development mode:
pip install -e .
Install ESO FITS Tools (required for
runPL_dfits):# On macOS with Homebrew: brew install cfitsio # Or install from source: # See: https://github.com/granttremblay/eso_fits_tools
Verify installation:
runPL_changeKeyword --help
runPL_create_pixelMap --help
# All runPL_* commands should work from any directory
Note: Installed commands can be run from any directory as runPL_changeKeyword, runPL_create_pixelMap, etc.
Pipeline Structure
Directory Organization
The pipeline uses a modular structure where each script is organized as its own subpackage under a src/ layout with core algorithms separated from CLI interfaces. This enables both command-line usage and interactive development in VS Code, Jupyter notebooks, or Python REPL.
first_pipeline/
├── README.md                     # This documentation
├── setup.py                      # Package setup and installation
├── requirements.txt              # Python dependencies
├── runPL_dfits                   # FITS inspection shell script
└── src/                          # Source code directory (src layout)
    ├── first_pipeline_shared/    # Shared components across all modules
    │   ├── __init__.py
    │   ├── classes/              # Data structure classes
    │   │   ├── __init__.py
    │   │   ├── runPL_class_couplingMap.py
    │   │   ├── runPL_class_dataCube.py
    │   │   ├── runPL_class_pixelMap.py
    │   │   ├── runPL_class_flatMap.py
    │   │   ├── runPL_class_waveMap.py
    │   │   └── runPL_class_preproc.py
    │   └── libraries/            # Utility functions
    │       ├── __init__.py
    │       ├── runPL_library_io.py
    │       ├── runPL_library_linalg.py
    │       └── runPL_library_plots.py
    ├── changeKeyword/            # FITS keyword modification module
    │   ├── __init__.py
    │   ├── main.py              # CLI interface with argparse
    │   └── run_changeKeyword.py # Core algorithms & development defaults
    ├── createPixelMap/           # Pixel mapping module
    │   ├── __init__.py
    │   ├── main.py              # CLI interface with argparse
    │   └── run_createPixelMap.py # Core algorithms & development defaults
    ├── makePreproc/              # Data preprocessing module
    │   ├── __init__.py
    │   ├── main.py              # CLI interface with argparse
    │   └── run_makePreproc.py   # Core algorithms & development defaults
    ├── createFlatMap/            # Flat field mapping module
    │   ├── __init__.py
    │   ├── main.py              # CLI interface with argparse
    │   └── run_createFlatMap.py # Core algorithms & development defaults
    ├── createWaveMap/            # Wavelength mapping module
    │   ├── __init__.py
    │   ├── main.py              # CLI interface with argparse
    │   └── run_createWaveMap.py # Core algorithms & development defaults
    ├── createCouplingMap/        # Coupling efficiency mapping module
    │   ├── __init__.py
    │   ├── main.py              # CLI interface with argparse
    │   └── run_createCouplingMap.py # Core algorithms & development defaults
    ├── makeImage/                # Image reconstruction module
    │   ├── __init__.py
    │   ├── main.py              # CLI interface with argparse
    │   └── run_makeImage.py     # Core algorithms & development defaults
    └── makeAstrometry/           # Astrometric processing module
        ├── __init__.py
        ├── main.py              # CLI interface with argparse
        └── run_makeAstrometry.py # Core algorithms & development defaults
Workflow
Inspect FITS files:
runPL_dfits <file>Update keywords if needed:
runPL_changeKeyword.py --X_FIRTYP=RAW *.fitsCreate pixel map:
runPL_create_pixelMap.py --filter_files *.fitsPreprocess data:
runPL_make_preproc.py /data/directoryCreate flat field map:
runPL_create_flatMap.py *.fitsGenerate wavelength map:
runPL_create_waveMap.py *.fitsCreate coupling maps:
runPL_create_couplingMap.py *.fitsPerform astrometry if needed:
runPL_make_astrometry.py *.fitsReconstruct images if needed:
runPL_make_image.py *.fits
Key Components
Shell and Python scripts: Each major step is a separate script
Data flow: Raw FITS files → Pixel Map → Preprocessing → Wavelength Map → Coupling Maps → Calibration → Image Reconstruction
Script chaining: Output from one script is often input for the next
Modern CLI: All scripts use
argparsefor professional command-line interfaces
Requirements
Python dependencies:
Core scientific stack:
numpy,scipy,matplotlibAstronomy libraries:
astropy,astroplanUtility libraries:
tqdm(progress bars)
External tools:
dfitsfrom ESO FITS Tools for FITS inspectionFITS keywords: Scripts rely on specific header keywords for file selection